One of the easiest ways to render a high-quality image in Corona or V-Ray without spending too much time on it is to use a denoiser. It removes the characteristic noise left after running Monte Carlo methods of the modern photorealistic rendering engines, which is almost impossible to resolve any other way. Denoisers also remove bright spots in places with complex geometry, inside translucent volumes and in reflections. 3DS MAX offers a choice of several denoisers, and we tested all of them to definitively find out which one is the optimal denoiser for Megarender render farm.
Where does the noise come from?
All rendering engines that allow for photorealistic rendering are limited by the hardware they run on. When using algorithms that imitate the physical behavior of light (such as path tracing and ray tracing), it is impossible to calculate the behavior of all possible photons in the scene. That’s why rendering in engines like Corona may continue indefinitely if we don’t set up a hard limit: the number of passes, maximum time or percentage of noise.
Noise forms because of these limitations on the number of rays or photons that the rendering engine is calculating, visible as uneven scatters of differently colored pixels where they are expected to be more uniformly shaded. These areas are where rendering didn’t get enough data to properly calculate the color of a given pixel. Another type of noise forms because the resolution of the rendered image is too small. One pixel may contain several objects or some complex geometry, the color of which must be approximated. When the rendering engine finishes calculations, it may end up with vastly different results for neighboring pixels.
To summarize, the more complex (and more realistic) the materials and light sources in the scene, the higher the chance of hard-to-calculate noise to appear on the final render. That’s when denoisers step in.
Denoising algorithms in 3DS MAX
When working in 3DS MAX with V-Ray and Corona you may choose between default denoising algorithms and third-party AI-driven solutions.
Default V-Ray Denoiser is being developed by Chaos Group based on unique V-Ray features. Denoising is applied to each rendering element to guarantee consistent results, meaning that if you take all the separate render elements and combine them into a full image it will be indistinguishable from the RGB channel. V-Ray Denoiser also exists as a standalone program with a unique Blend feature: the denoiser uses data about neighboring frames and blends noise between them to make animations smoother, maximally removing trembling and twitching noise.
Corona Denoiser (also known as Corona High Quality in earlier versions) comes with Corona Renderer and applies at the end of rendering as a post-processing effect. This denoiser analyzes the noise and reduces it without creating splotches and maximally conserving sharpness of edges and textures. Corona Denoiser only uses CPU and works on any computer that already supports Corona. It’s possible to tweak the power of denoising on the final image using the Amount parameter to avoid unwanted blurring. You can also perform denoising separately from rendering by choosing ‘Gather data for later’ in the options and saving the results as a CXR file. Open this file in Corona Image Editor later to denoise the image and adjust the amount.
Both of these denoisers work only with the data already in the scene. They can’t refine details where texture sharpness is lost due to too much noise. For best results, such denoising should be performed once the noise level has already dropped to a low percentage, which can lead to long render times.
This is where AI denoisers come into play. These denoisers are trained on large volumes of data to identify and remove noise, much the same way modern LLMs are. 3DS MAX supports two such AI denoisers.
Nvidia AI Denoiser, also known as Optix Denoiser, is developed by Nvidia and works only with modern Nvidia GPUs. Unlike default V-Ray and Corona denoisers, Nvidia Denoiser starts working after 5 rendering passes (in Progressive mode) allowing for a fast preview. The longer the rendering goes, the more data this denoiser gets, and the better the results. It is perfect for fast previews and testing WIPs.
Intel Open Image Denoise (Intel CPU/GPU AI Denoiser) is an alternative AI denoiser developed by Intel. It comes with a set of AI denoising filters trained on a large number of images. It works well for both fast previews and for production-quality images. Its main advantage over Nvidia Denoiser is that it works on either GPU or CPU regardless of manufacturer (so most of the modern CPUs and GPUs support Open Image Denoise).
Pitfalls of working with render farms
It’s important for us at Megarender online render farm to provide the best service for an affordable price, so we decided to test the effectiveness of all 3DS MAX denoisers and see whether GPU denoising is faster than CPU alternatives.
When rendering in Corona, the rendering time difference between Corona Denoiser and Nvidia/Intel AI Denoisers becomes noticeable only for long renders in high resolution or if there are lots of render elements to denoise. Generally, AI denoisers work faster, but when rendering test scenes at Corona render farm, we didn’t notice a discrepancy that couldn’t be explained by the general randomness of the rendering algorithm. If you have many render elements and you don’t want to spend more money on denoising them, use ‘Gather data for later’ in the settings and denoise on your PC. Corona Denoiser works well, sometimes even better than AI denoisers. Nvidia GPU Denoiser utilizes the graphics card in short bursts without much need for VRAM, meaning most of the time GPU stays idle and there’s no reason to pay extra for a GPU server. We didn’t notice any difference in quality and speed between Nvidia and Intel CPU AI denoisers.
|
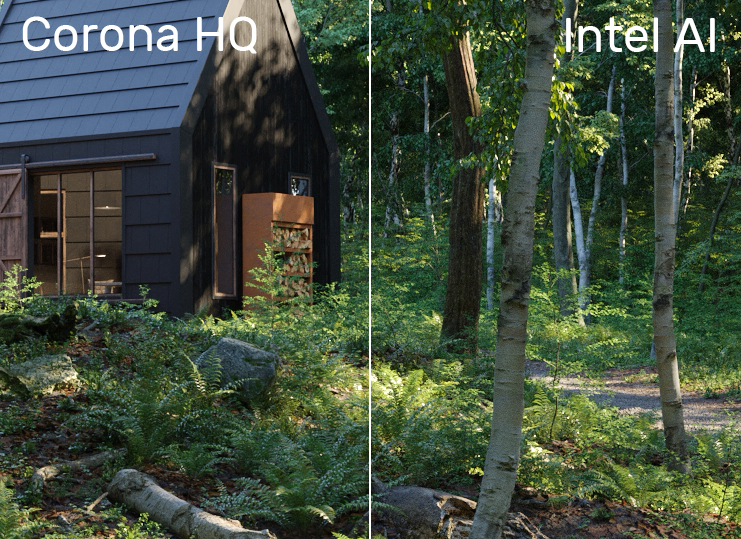
| In this test, we rendered 15th Anniversary Collection scene from Evermotion to 5.5% noise level in 1600×1000 pixels resolution. The rendering time difference was 1 second. |
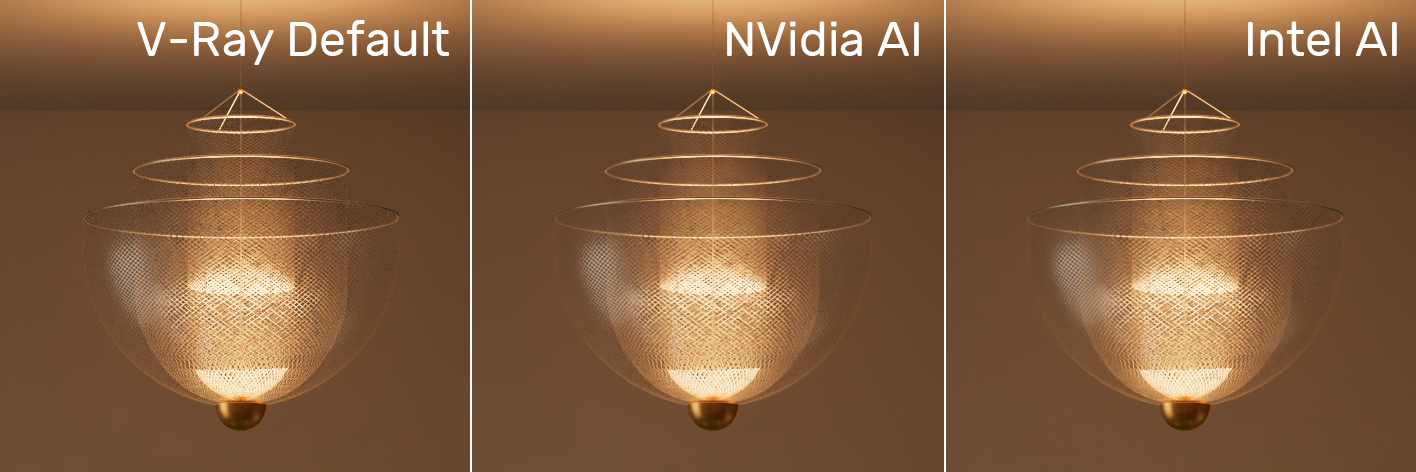
The difference between denoisers in V-Ray is more obvious. Chaos recommends using the default denoiser for production rendering and it is indeed more delicate with textures and small details, but is worse at smoothing the Monte Carlo noise in dark places.
|
| V-Ray Default Denoiser preserved more details but left behind lots of noise. Nvidia AI Denoiser smoothed dark places better while Intel AI Denoiser excelled around the bright light. |
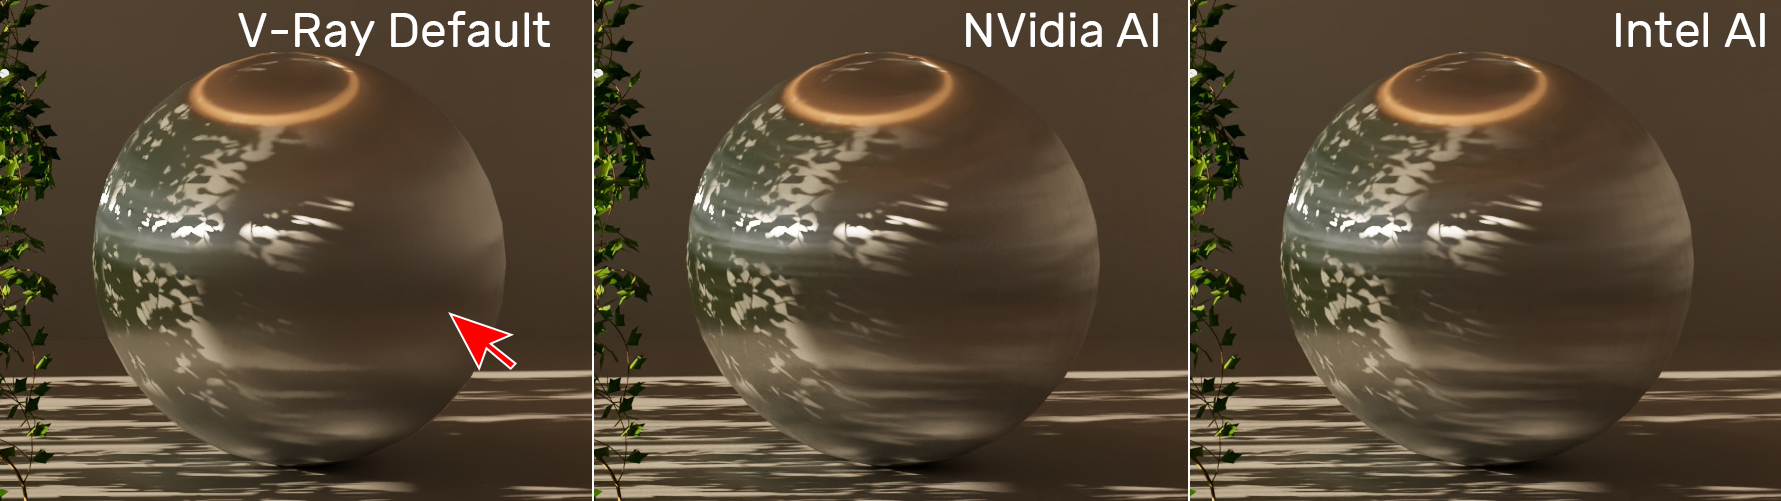
V-Ray Default Denoiser also behaves oddly with reflections, overblurring the details compared to Nvidia AI and Intel AI. This blurring happens only in places where there wasn’t much noise to begin with.
|
| In this test scene, you can see how V-Ray Default Denoiser blurs the reflections. There’s no difference between Nvidia AI and Intel AI denoisers. |
We also tested V-Ray Standalone Denoiser to see if it really gives better results in animations, but once again we couldn’t spot much difference. Noise inconsistency was visible for all three denoisers, leading to flickering in scenes with many small light sources. Additionally, you have to render frames into EXR or Vrayimage formats to use V-Ray Standalone Denoiser, and these are heavy files. After denoising, the program will save the results into the same format so you may need to convert them before using your video sequencer of choice.
Nvidia offers a similar option called Temporal, which blends neighboring frames for noise reduction. We didn’t see a significant difference between videos rendered with and without this option activated, but it made us realize its unfortunate downside. Temporal uses data from a frame previously rendered by the server, but even on the cheapest rate at Megarender you have access to two GPUs at the same time. During rendering, these GPUs don’t communicate, and Temporal uses nonconsecutive frames, leading to rendering artifacts: smudged lights and doubling of geometry.
Denoising at Megarender
The main results of our testing:
- Nvidia AI Denoiser and Intel Open Image Denoise work identically in most situations when it comes to speed and quality, but Intel’s denoiser uses CPU if no GPU is available.
- Default V-Ray Denoiser gives good results only when rendering to much lower noise thresholds compared to Nvidia AI and Intel AI denoisers.
- Corona Denoiser often works better than AI denoisers but may be slower, which is especially noticeable in projects with a high number of render elements.
When rendering in Corona, use Corona Denoiser or Intel CPU AI Denoiser. Remember that the more render elements you have, the longer Corona High Quality denoising will take. You can perform denoising on your PC to make it cheaper.
When rendering in V-Ray, use Default V-Ray Denoiser or Intel Open Image Denoise. You’ll have to render for longer for a better result with the default denoiser and may lose some details in reflections. Intel Open Image Denoise shows great results and reduces rendering time when used in Progressive mode (using passes rather than buckets, as in Corona).
We decided not to support Nvidia AI Denoiser at Megarender as it would mean overpaying for GPU servers that sit most of the time anyway. The only option that sets it apart from Intel AI Denoiser – Temporal – can’t even be used on the render farm since render nodes process frames non-consecutively.
If your project was made with Nvidia AI Denoiser in mind, switch to Intel CPU AI Denoise/Intel Open Image Denoise instead.
---
We offer all new users a chance to try our online render farm for free. Simply sign up and get a $30 Welcome Bonus in the Bonuses tab. You can ask any questions in our support chat, we work 24/7!


